Connect to your first bank API in 15 minutes. It's easier than you think.
I’ve been to multiple treasury conferences over the years and I hear the same thing “All these new treasury tech developments sound great, but where do I actually start?”
You start by getting your hands dirty and achieving small wins.
This article is going to walk you through your first win, which is connecting to a bank’s API and hooking it up to a simple treasury dashboard.
Of course there is more complexity to using a banking API in production, but it’s a start.
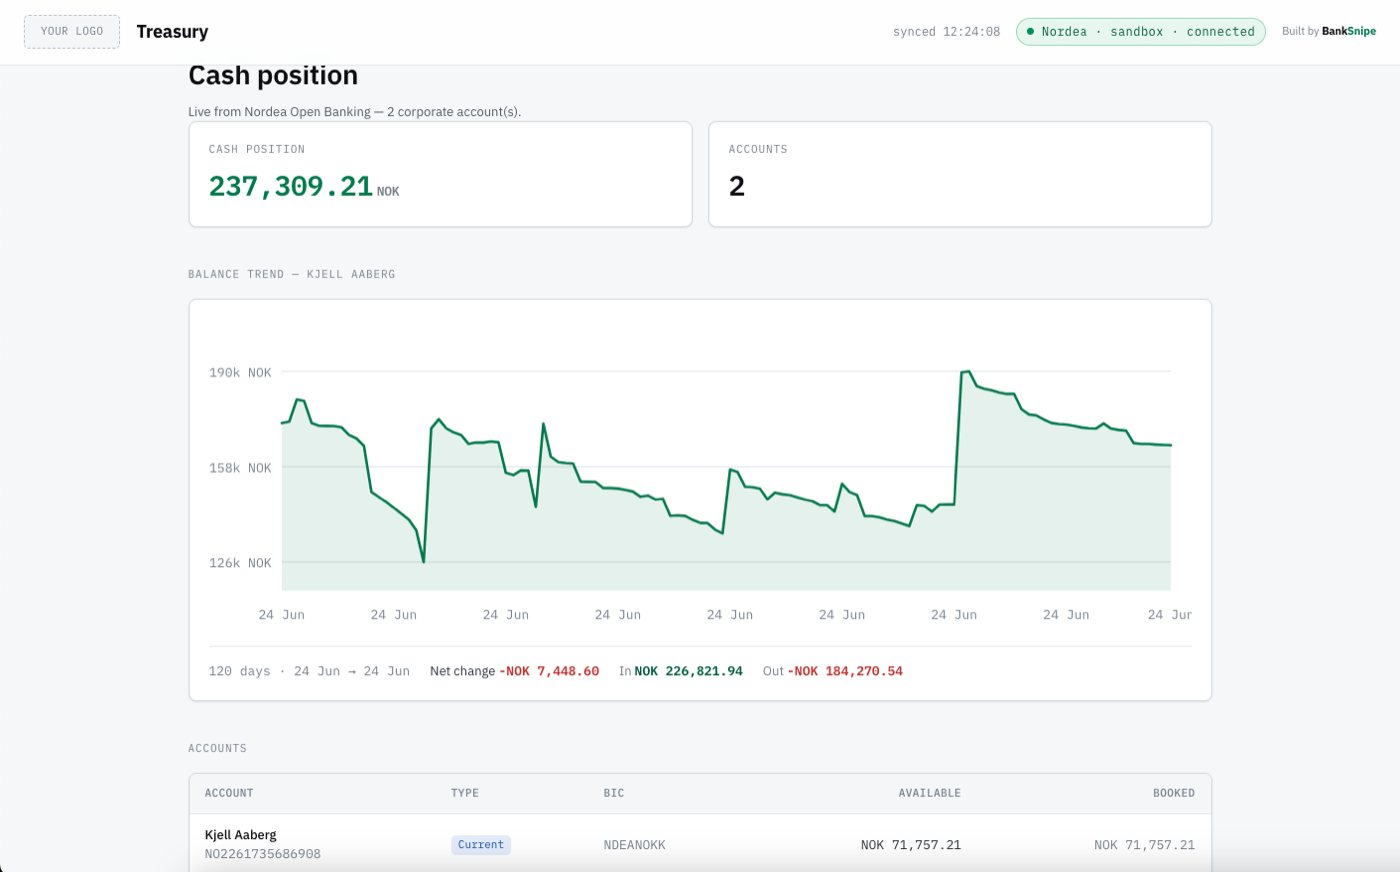
I’m going to show you how I connected to a real bank, pulled live balances and transactions, then connected a small treasury dashboard to visualize the data.
This is not going to replace your TMS. It is not production ready. It is one small win. And small wins are how you get to the bigger ones.
Why this is worth 15 minutes of your time
Most treasury teams still get balances the slow way. A file lands the next morning, often as an MT940, split across a different portal for every bank. By the time you have a full picture, the picture has moved.
An API gives you the position now, on demand, in a format you control.
I am not suggesting you rip anything out. I am suggesting that once you have seen your own balances come back from a bank in a few seconds, you understand the machinery underneath your tools.
That changes how you buy them, how you brief your team and what you ask vendors for.
The mindset shift
An API is just the bank handing you data when you ask for it, in a tidy format a computer can read.
You ask “what are my accounts”, it answers.
You ask “what are the transactions on this one”, it answers.
The bank is not the hard part. The only unfamiliar bit is asking it for your data and you won’t be doing that by hand.
You’ll run a small script that does the asking for you. Builders start before they feel ready. You’re about to.
What you need
Five minutes of setup before the fun part.
- A free Nordea developer account
- An app inside that account
- A Client ID and a Client Secret, which are just a username and password for your app
- One product subscription, so your app is allowed to read accounts
That is it. No certificates, no contract, no cost.
To see your data you’ll install one free tool (Node) and run a tiny script with your keys. To turn that data into a dashboard later, you’ll add one more (git). Both install with a single command, the same way on Mac and Windows.
Win number one: you are in the sandbox
Go to the Nordea developer portal and sign up for the sandbox. Confirm your email and log in.
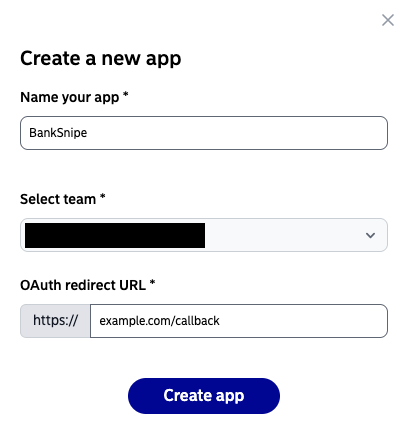
Now create an app. Give it a name. When it asks for an OAuth redirect URL, the field already starts with https://, so type example.com/callback after it. It’s just where the bank would send you back after login and in the sandbox nothing actually loads there.
It only has to match the address the project already uses, so use that exact one.
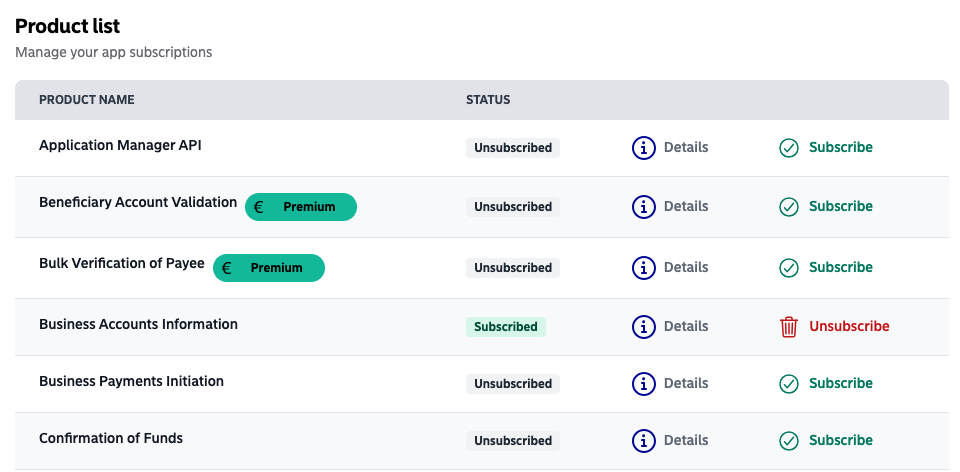
Then find the product called “Business Accounts Information” and click “subscribe”. This is the one that returns corporate accounts, balances and transactions. It is free in the sandbox. Ignore everything marked Premium.
Last thing, copy your Client ID and Client Secret from the app page and keep them somewhere safe.
Stop and notice what just happened. You have developer access to a bank. Most people in your industry have never seen this screen.
Win number two: see your real data
You’ve got the keys. Now you point them at the bank and watch your accounts come back. You’ll do it with one tiny script and your two keys. No long codes to copy by hand, no fiddly setup.
Open your terminal. On a Mac, press Cmd+Space, type Terminal then hit Enter. On Windows, press the Windows key, type PowerShell then hit Enter.
First, install Node. It’s the free tool that runs the script. You only do this once.
On a Mac, this first line installs Homebrew (the standard Mac package manager, it’s Homebrew’s own official installer), then the second installs Node:
/bin/bash -c "$(curl -fsSL https://raw.githubusercontent.com/Homebrew/install/HEAD/install.sh)"
brew install node
On Windows, winget is already built in, so it’s one line:
winget install OpenJS.NodeJSWhen it finishes, close the terminal and open a fresh one so it picks up Node.
Then download the little script. It’s a single short file you can open and read for yourself. All it does is ask the bank for your accounts and print what comes back. This line saves it into whatever folder your terminal is in:
curl -o peek.mjs https://raw.githubusercontent.com/boomahora/treasury-dashboard-demo/main/peek.mjsOn Windows, use curl.exe instead of curl:
curl.exe -o peek.mjs https://raw.githubusercontent.com/boomahora/treasury-dashboard-demo/main/peek.mjsA good habit worth keeping for life: never run a script you haven’t looked at. You can read this one first on its GitHub page. Not a developer and none of it means much to you? That’s fine. Paste that link into whatever AI assistant you use (Claude, ChatGPT, Copilot) and ask it whether the file does anything it shouldn’t. I wrote it to do exactly what this article says and nothing more, but you should never have to take my word for it.
Now run it with your two keys. Swap in your real Client ID and Client Secret from win one:
node peek.mjs YOUR_CLIENT_ID YOUR_CLIENT_SECRETYour accounts and balances print straight back, followed by the bank’s raw answer. That is a bank answering you.
It also quietly saves your two keys to a small file in your home folder, so the dashboard in win three can reuse them and you never type them again. You can delete that file whenever you like.
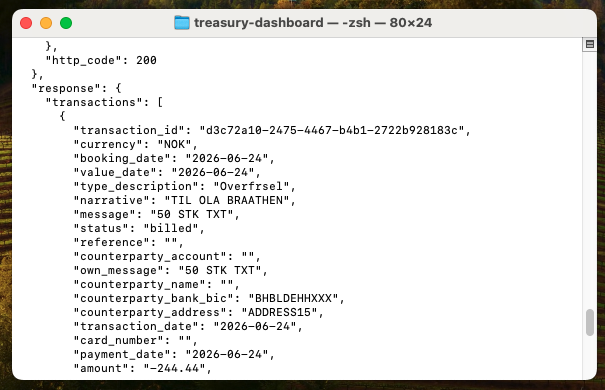
The bottom half looks raw because it is. That’s the bank’s honest answer before anything dresses it up. Read it for a second. Those are accounts, balances, real transaction lines.
Take that in for a second. The script just asked the bank three things, in order: prove who you are, get a token, then ask for your accounts. That back-and-forth is all an API is. It’s the same exchange running underneath every treasury tool you’ve ever been pitched, except this time you saw it happen with your own keys.
And it all stayed on your machine. Your keys went from your laptop straight to Nordea.
Worth a look inside
peek.mjs: one header readsSKIP_SIGNATURE_VALIDATION_FOR_SANDBOX. Real Nordea traffic has to be signed with a certificate. The sandbox lets you skip that while you learn. It’s the one bit that turns into real paperwork in production. We’ll come back to it.
Win number three: turn it into a dashboard
Raw text makes the point, but it’s not something you’d want to read every morning. So let’s put the same data behind a simple dashboard. This is where you bring in the full project from GitHub.
First, install git. It’s the free tool that downloads the project. Like Node, you only do this once. If your terminal already knows git (try git --version), skip this.
On a Mac:
brew install gitOn Windows:
winget install Git.GitOn Windows, close the terminal and open a fresh one afterwards so it picks up git.
Then download the project. I’ve already built it for you, so there’s still no code to write. This copies the whole thing into a folder and steps you inside it:
git clone https://github.com/boomahora/treasury-dashboard-demo.git treasury-dashboard
cd treasury-dashboard
cd is short for “change directory”. It moves you into the folder that was just created, so the next commands run in the right place.
Run it. One command:
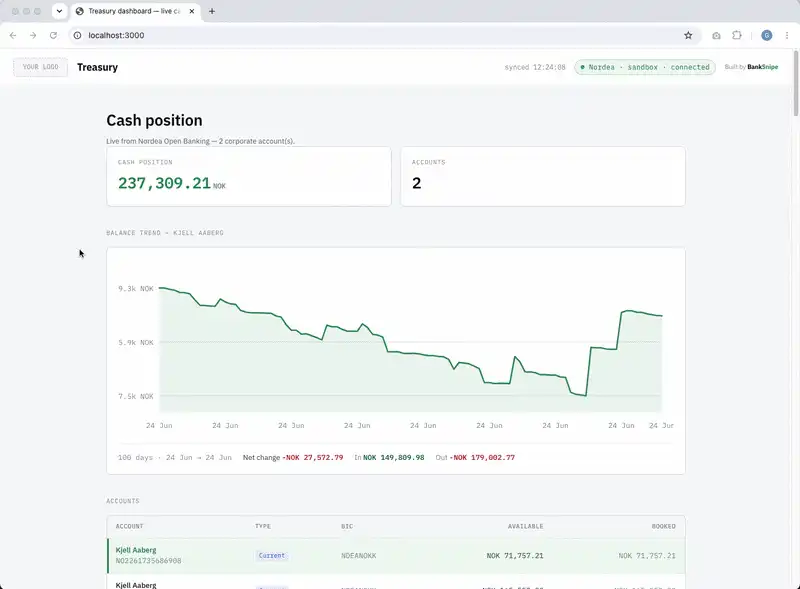
npm startOpen the address it prints (localhost:3000) and there’s your cash position, every account, a balance trend for each one, transactions a click away. The same data you just saw as raw text, now laid out like a tool you’d actually use.
Your keys never left your machine. Everything ran locally, talked straight to Nordea’s sandbox and showed you the result. Nothing was sent to me or anyone else.
What this unlocks
I will not oversell it. But now that you have seen how little stands between you and live bank data, a few things stop feeling out of reach.
- A real-time cash position across every bank you hold, in one view
- Reconciliation that runs against live data instead of yesterday’s file
- Alerts when a balance crosses a threshold, or when a large payment lands
You are not building any of that today. You are just seeing that the door is open.
The honest bits and the next mountain
So you can keep your footing, here is what this is not.
This is sandbox data, not your real accounts. To read real money in production you need to be an authorised account information provider, or you go through an aggregator or your TMS that already holds that licence. That is a real step, with real paperwork.
None of this replaces the work your IT team, your TMS or your vendors do. Production systems carry real weight: security, reliability, scale, audit. That complexity exists for good reasons. I am not waving it away. I am showing you the first rung, so the rest stops feeling like a black box and you can have a sharper conversation with the people who build the rest.
Here is the gap, laid out plainly.
| Sandbox (today) | Production (the next mountain) | |
|---|---|---|
| Data | Realistic test accounts | Your real accounts |
| Request signing | Skipped with one setting | Certificate required |
| Licence | None | Authorised provider, or via an aggregator or TMS |
| Cost | Free | Depends on the route |
But it is not today’s problem. Today you got your feet wet. You learned the shape of the whole thing. That shape does not change in production. The certificates and the licence are just the next mountain, for when you are ready to climb it.
Where to go from here
You’ve seen how little stands between you and live bank data. Here’s where to take it next.
- Keep the script. Point it at a different Nordea sandbox product and see what else comes back.
- Got Claude Code or Codex? Point it at the project and tell it how you’d change the dashboard, a new chart, a different layout, a balance alert. It’s your code now, on your machine.
- Browse the BankSnipe index to find which banks have the friendliest APIs and sandboxes.
- When you want real accounts, that’s the production step in the table above: a certificate and an authorised-provider licence, or a route through your aggregator or TMS.
Treasurers are builders. You don’t need to be an expert on day one. You need a first small win. You just had it.
Frequently asked questions
Do I need to be a developer to connect to a bank's API?
No. You register an app, copy two keys, install one free tool (Node) and run a short ready-made script with your keys. Your accounts come straight back as the bank's reply. The code is written for you. If you then want the dashboard, you download the project and start it. No IDE, no AI tool, nothing to buy.
Is the data in this tutorial real?
It is real in shape but not your real money. You connect to Nordea's sandbox, a full copy of the live API that returns realistic test accounts, balances and transactions. It behaves exactly like production, which is the point, but no real account is exposed and nothing can move.
Do I need a licence to use a bank's API?
Not for the sandbox. Anyone can register and test. To read real customer accounts in production you need to be an authorised account information provider, or you connect through an aggregator or your TMS that already holds that licence. The sandbox lets you learn the whole flow before any of that matters.
Can I connect this to my real company bank account?
Not with this setup. This is sandbox test data, on purpose. Reaching your real accounts needs the production access above, which is a bigger step. Think of this as getting your feet wet, not as the finished system.
Which banks have the easiest APIs to start with?
Nordea's sandbox is one of the friendliest because it lets you skip request signing while testing, so you avoid certificates on day one. Others need a test certificate even in the sandbox. You can compare API maturity and sandbox availability across European banks in the BankSnipe index.